

Super-Simple Brazing Copper Beginners Guide
With global industrialization, certain features of copper became pivotal for brazing operations, such as resistance to atmospheric corrosion excellent, high resistance to chemical attack, and superb electrical/thermal conductivity. Copper can make alloys with many different metals and a large number of alloys that feature excellent mechanical and technological preferences, such as tensile strength, yield strength, resistance to wear, chemical resistance, and hardness. If their particular mechanical and physical properties are considered, copper and the majority of copper alloys feature a high degree of brazeability. The copper brazing is suitable when higher joint strength is needed for a system that operates at 1100 degrees F or higher. Most common uses include air-condition, refrigeration, fire protection, fuel gas distribution, and water suppliesThings to Consider When Braze Copper
When brazing copper, the recommended filler metals are silver brazing alloys, brass brazing alloys, and copper-phosphorus. Silver brazing filler metals have lower brazing temperatures, which minimizes the risk of forming coarse grains and provides quicker brazing speeds. Also, it’s important to consider the oxygen content of the parent copper when choosing the brazing technique. Brazing-oxygen containing copper can form the formation of cracks and voids after contact with hydrogen-containing gases. Some details should be kept in mind when preparing to braze copper.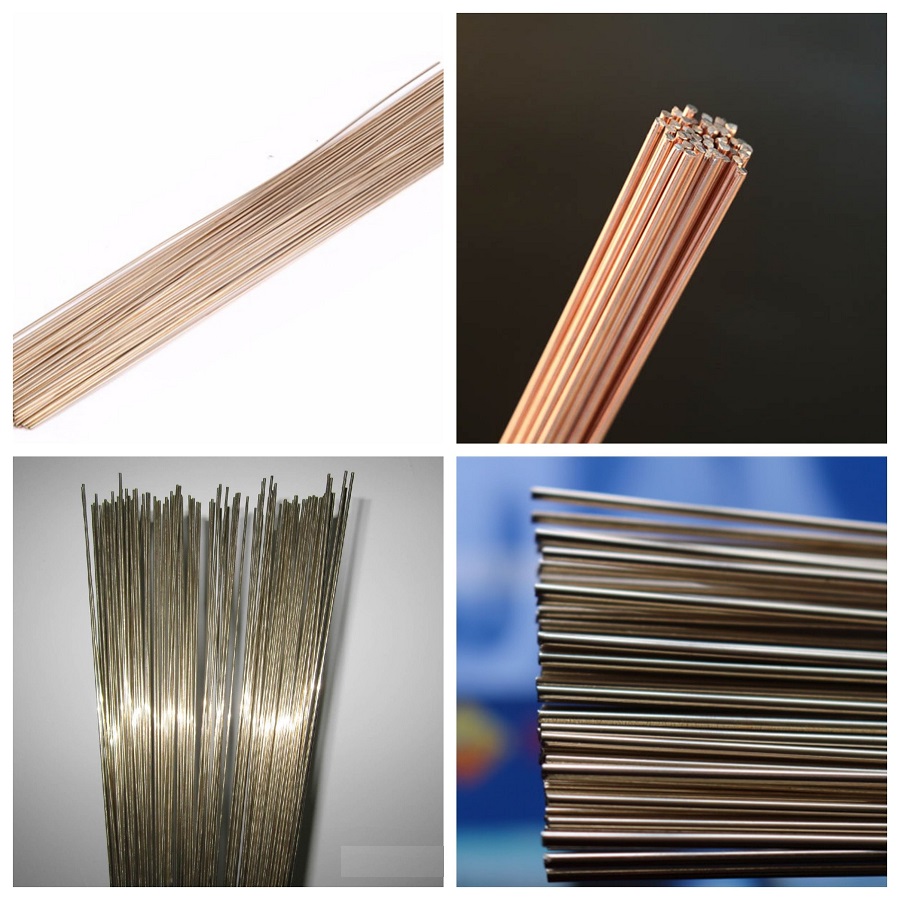
For example, a slightly carburizing flame should be utilized, and proper fluxes are crucial when employing silver brazing alloys. Lap joints work perfectly with an annealed copper brazed joint. Both oxygen free and oxygen-bearing copper can be used for brazing work. The clearance for allowing filler metal penetration in small to medium diameter pipes shouldn’t be more than 0.002 to 0.003 inches. For large diameter pipes, clearance shouldn’t exceed 0.008 to 0.100 inches.
Things to Avoid When Braze Copper
Copper is one of the most widely utilized metals in the construction industry. This process is often applied by engineers as alternative welding when temperatures above 850 degrees F are being used for soldering. Therefore, to braze copper properly without mistakes, these are things that you need to avoid:- Not enough clearance for the filler metal to make a joint between the base metals;
- Utilizing unclean metal surfaces for making the joint;
- Applying the wrong flux composition that isn’t a proper fit for the metals being used;
- Not covering the surface area with flux entirely before beginning the brazing process;
- Composing the joints in the wrong position will cause improper conjunction for the brazing;
- Not eliminating the flux residue after the brazing process is done, which cause weakened joints since the flux material has the potential to corrode.
How to: Brazing Copper to Steel
If you want to braze copper to steel, preheating the copper is required due to the high thermal conductivity of copper relative to steel. It makes brazing of these metals quite easy with adequate control and design of the used brazing method.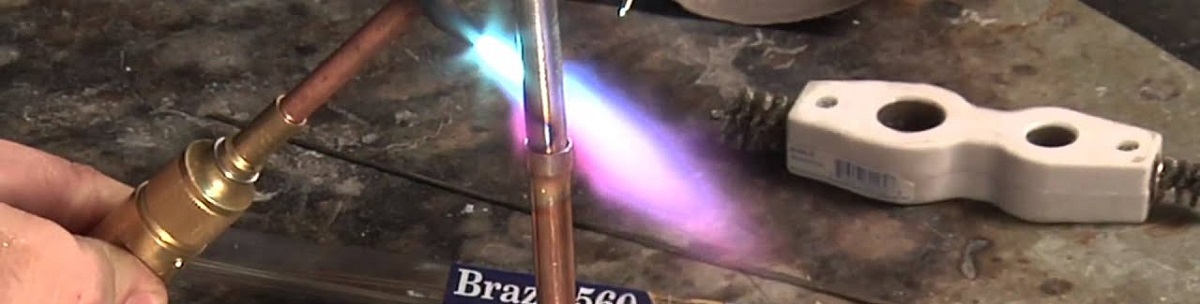
Here are 6 steps for brazing copper to stainless steel:
- Clean and flux the surface to be brazed;
- Use a torch that produces a flame that is hot enough to heat the area quickly. But, not so hot that it’s hard to control;
- Ensure to use a torch that includes a soft flame that is big enough to wrap around the joint;
- Apply the right flux for the job. You can find available manufacturers charts that match brazing filler metals with adequate flux;
- Keep the torch moving to “skip” hot spots and direct the heat to the areas that need it most;
- It’s highly recommended to follow oxyfuel safety rules.
How to: Brazing Copper Pipe
Brazing cooper pipe isn't that complicated, with the right tools, and the following steps, you’ll be able to braze successfully and save some bucks.
You just need to:
- Mark the pipe properly to determine accurate lengths;
- Cut the pipe with a hacksaw;
- Smoothen both ends of the cut pipe to remove any metal residues;
- Prepare joints by cleaning areas to be brazed with a sand cloth. It’ll remove any impurity such as oxides or oil. The allowance between the pipe and fitting should be 0.004”;
- Put the pipe in the fitting ensuring a secure fit, but leave enough space for its capillary action;
- Take an oxyfuel torch with a neutral flame. Hold a flame perpendicular to the assembly, while heating the copper brazing rod and pipe uniformly. Don’t overheat since it could cause the flux to burn. Keep the flame in the motion and avoid staying too much on any part of the pipe;
- Contact the filler metal with the joint which should begin to melt. Apply at the point where the pipe enters socket of the fitting. Once the filler metal melts, transfer the heat to the base of the joint. Stop heating when you see a complete joint;
- Let the joint to cool without the use of water. After cooling, clean off any flux with a wet cloth.
Brazing Aluminum to Copper
Brazing aluminum to copper has wide use in the refrigeration industry where copper pipes are brazed to aluminum roll-bond pipes or panels. To bond aluminum and copper, a flame brazing would be applicable or applying a low-melting flux with a low-melting filler metal. It’s very similar to brazing aluminum to aluminum, but some precautions are necessary. Anyhow, when copper is brazed to aluminum, and the heating process takes too long, the copper will spill into the aluminum at the joints. Hence, during the brazing process, the flame should never be directly applied to the joint, since the heat should be transferred by conduction through the parts to be brazed. As soon as the filler metal starts to melt, the flame must be quickly removed.
Aluminum has a quite lower melting point than copper (Al: 1200° F; Cu: above 1830° F). That’s why the flame is typically directed on the copper. Still, once the heat transferred from the copper to the aluminum reaches the melting level of aluminum, it’ll start to burn down very quickly, while the copper is still absorbing the heat. Therefore, flame brazing of aluminum to copper is a delicate operation and needs some experience. This brazing method is utilized by many companies for mass production.
How to Braze Copper Sheet Metal
Brazing needs specialized fluxes and filler metals to provide a strong joint between the copper sheets. The great benefit of brazing is that the copper won’t oxidize throughout the joining operation, leaving the surface cleaner. Keep track on these 5 steps and learn how to braze copper sheet metal. Step #1 Sanding Sand the copper sheets where the joining will take place using a sanding cloth to remove oxidation, debris, and burrs. After sanding, sheets will have a shiny and bright look. Step #2 Sheets' Position Put a copper sheet on a non-flammable work surface, ensure with clamps, and place the second copper sheet in a place where they’ll join. Remove all flammable staff from the area to avoid a fire.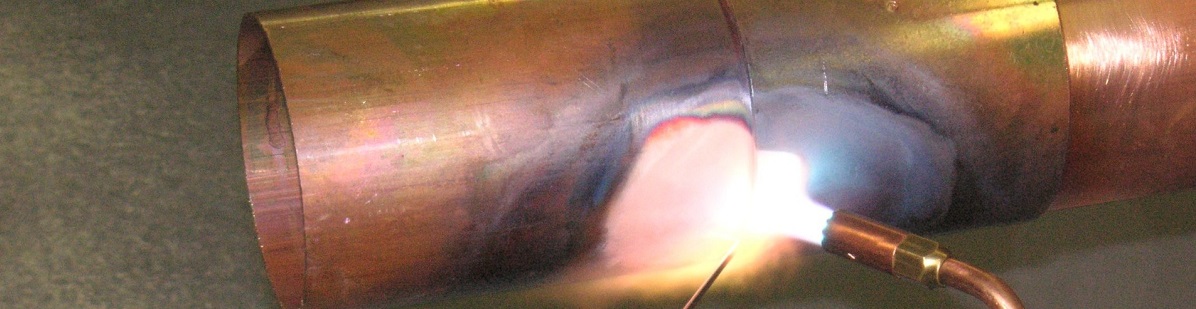
Step #3 Use the torch Start the oxy-acetylene torch and heat the copper area, move the torch constantly to avoid reducing the copper to molten metal. Continue to move the torch back and forth as far as the copper is hot enough to melt the filler. Step #4 Apply the metal filler Contact the hot copper sheet with specially designed brazing filler metal. The metal filler will melt and via capillary action will cover the heated surface and join these two sheets. Step #5 Cooling Let the copper sheet to cool entirely and take a sanding cloth to rub away excess filler softly.
Brazing Copper Tips
There are many benefits of using copper brazing. For example, it protects against fires that are present near the joints and raise the temp of the joint properly. On that account, adequately brazed copper is a critical factor for a successful project. To accomplish perfect copper brazed joint, follow these few tips:- For successful cleaning of heavy rusted surfaces and other impurities, the rotary tool with grinding wheel is the best choice for you;
- Always use proper brazing rods for copper;
- While determining the proper clearance for two different metals, consider the different expansion rates for both and put it into the calculations;
- Capillary action, which is the base for the brazing operation, doesn’t work correctly on unclean surfaces. If the surface has dirt particles, oil, or similar excess, the filler metal will be unable to stick, and the joint will crack. So, make sure the areas are clean and free of any impurities.Solvents can be applied to remove oil stains, while oxides can be eliminated with the emery cloth;
- There are some projects where the flux isn’t required for brazing. It includes copper to copper joints, as well as joints that are bound together in controlled conditions, which contains a gaseous mixture in a closed space. The lack of oxygen in the enclosed atmosphere stops oxidation from taking place on the joint;
- The great way to keep parts together for brazing is by applying gravity. Adding extra weights to the brazed form can also make it more secure;
- A good support fixture can also make the copper brazing easier. The fixture must have the least mass possible along with the most basic design necessary. It must also have the least amount of contact possible with the parts of an assembly;
- The material used to make the fixture should be able to withstand the high temps it’ll be exposed to throughout the brazing operation. Once the actual brazing begins, pay close attention to the flux. If the color alters uniformly, it means that the parts have heated properly;
- Always check the filler metal next to the joint so that the material doesn’t spread out over the plate but flows directly into the joint;
- If the joined parts overheat during the brazing, the flux becomes saturated with oxides, and the color becomes black or green. In that case, apply a mild acid solution to clear out the flux.